|
|
Post by don73tx750 on Oct 7, 2015 21:23:47 GMT -5
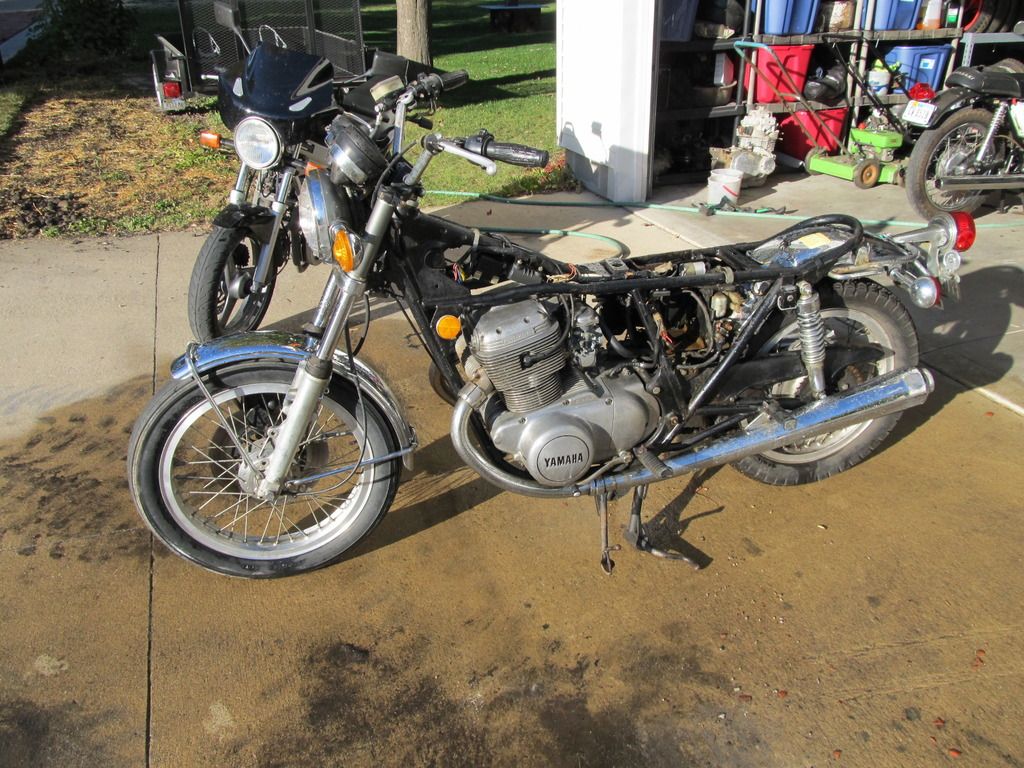
And so another project begins. Here's what I brought home last night, 341-005475.
s1222.photobucket.com/user/donfriel/library/73%20TX750?sort=3&page=1
I spent a couple hours on this tonight and here's what I found.
The good: The whole bike basically. I was expecting a rusted out hulk, but this thing was parked up in the back of a garage and looks like it will clean up well. Most of my other bikes were in a lot tougher shape when I started on them. Just so you know where I'm coming from, my love of vintage bikes comes from putting old shed/barn bikes back on the road and riding the hell out of them. I don't restore them. I like patina; I clean up what's there and wrench them so they're safe to beat on. I've dropped or scratched about every bike I've owned so fancy paint is a waste. I love looking at it on yours but I'd rather spend my $ on tires, oil, chains, etc. I pulled the plugs and shot a squirt of Marvel Mystery Oil in, kicked it over a couple times, put the plugs back in and it has real good compression. The seat pan is in excellent shape, but you can see a rodent was getting comfortable under there and has gnawed out some foam from that big pan hole in front by the gas tank. The rims look fantastic! Barely any rust on the spokes. If the engine is sick those wheels and swing arm are going straight on my XS650. The swing arm bushings have zero play in them. Tight! The chrome looks real good. I have the whole bike sprayed with WD40 and will give it a bath in a couple days and am anticipating good results. I always do this first because I hate wrenching in filth when I take them apart. The pic of the inside of the gas tank looks a lot worse than it is. The black spots were varnish that just flicked off with a nudge of a fingernail. The rust is just light surface that will flush out with vinegar, I hope LOL! The petcocks both took a little snap to free off, but since they're the same as an XS650 it will be a couple kits from MikesXS to the rescue. It came with 1 key, and all the locks function. The bad: The front brake is toast. Master cylinder was dry and the caliper was dragging. This thing was a pig to push around so I pivoted up the caliper and pried a little clearance with a screwdriver. I stock a Chinese 11mm m/c on the spares shelf, and due to Yamaha parts interchangeability my spare RD400 caliper will go right on. I'm not real big on riding with 40 year old brake hoses but externally they look good. Time will tell on those. The tires, of course, are toast. But since I was thinking of putting these nice rims on my XS, I might put the XS mag wheels on this and see how it looks. Bill said he dumped it on some wet grass a month before he parked it up and that's why the right muffler is trashed. It also bent the shit out of the rear brake pedal, but at least it didn't gouge the engine side cover. Whew! The carb slides are well and truly stuck. This could be the biggest hang-up of the whole build. My XS is an 81, so my spare carbs are BS34's, not the BS38's I need. If they really mess with me I might have to go with some Mikuni round slides. Actually, this is probably a good thing but after 29 years it went wet sump. Drained the oil and there was a few sparklies in it. I'll figure that out later.
So that's where I'm at. I have my test battery on the charger and will see where the electrics are regarding spark and lights tomorrow. |
|
|
|
Post by farmrjohn on Oct 8, 2015 10:00:08 GMT -5
I like that fairing. Probably the toughest parts to find will be the right muffler and air cleaner. Everything else pops up on ebay, like the airbox and tank badges. The tips portion of this site has a workaround for the air cleaner using two Triumph Bonneville filters which is what I've done with my '74.
|
|
|
|
Post by don73tx750 on Oct 8, 2015 13:34:55 GMT -5
The air box and snorkel were in a box so I have those, but no air filter. I'll probably just throw a set of foam pods on. I checked fleabay for a muffler but pickings were slim. If anyone has a usable, cheap one I'm in the market. Also could use an oil filter adaptor.
Bill said the fairing was made by Shoei. I guess they make more than helmets.
Also, What is the quick way to tell if this has the adj. balance chain upgrade?
FJohn, what color tractor do you ride out in the field?
|
|
|
|
Post by don73tx750 on Oct 10, 2015 7:08:34 GMT -5
Got a little more work done yesterday. Rolled it on the drive and washed the top layer of mung off. It's now clean enough to lay some wrenches on it.
They say you can't polish a turd but this one is trying to take a shine  . .

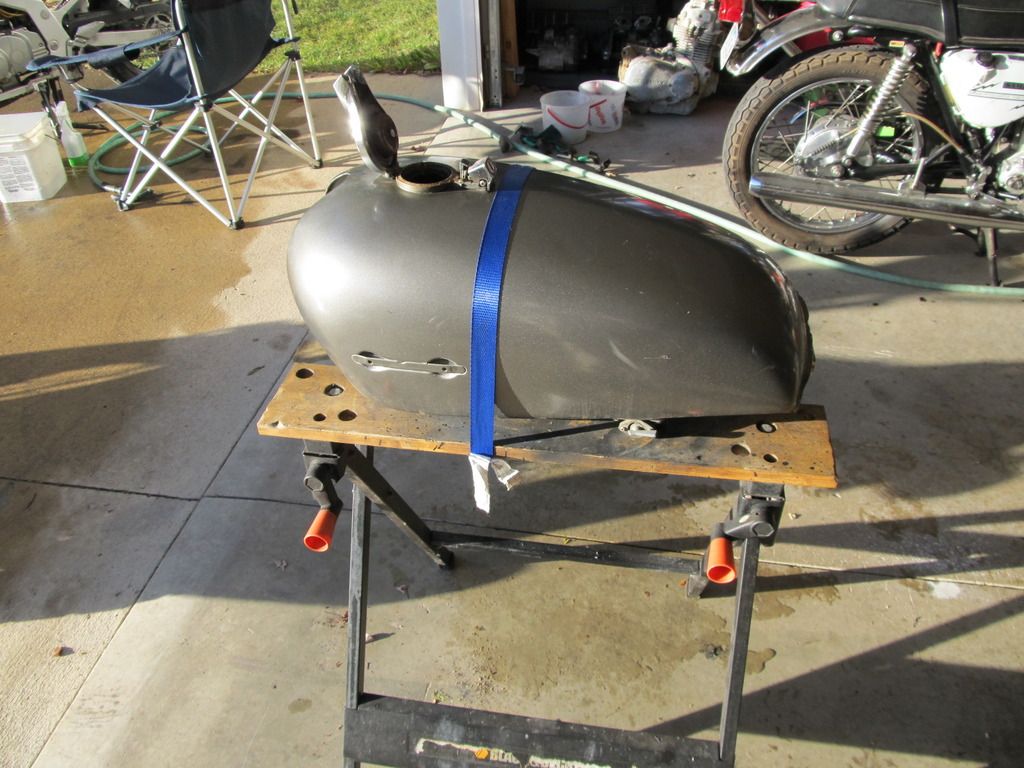
While the washing is going on, I have the stock pot on the stove heating water for the initial gas tank flush. I poured about a quart and a half of Simple Green in the tank and filled it up with the almost boiling water.
Then it was on to the electrickery. I hooked the ground cable up to my test battery and a jumper wire to the red ign. switch feed connector. Turned on the key and was amply rewarded with the neutral light, oil pressure light, and the left turn indicator light. Cool! Off to a good start . Both front and rear left turn bulbs are on but not flashing, but a wiggle of the connector and a tap on the flasher has it winking. Tried the right turn and both bulbs light but could only get it to wink 3 or 4 times. I've played this game before. I'll pull the guts out of the flasher and clean the contact points. And the horn goes beep, beep, beep. Score! Time to check for spark, pull the plugs and give it a swing, and nothing. Damn, that would have been too easy. Time for a break to see the damn Cardinals beat my Cubs. Totally depressed I go back out to shake the gas tank some more and roll the bike into the shed for the night and I notice the kill switch is off. Doh! Turn it on and kick it and see spark in the right plug. 7 or 8 more swings and the left plug decides to join the party, and I'm straight into my happy dance  ! ! By this time I see some tank flush dripping out of the right petcock. No biggie as I figured on putting kits in them anyway. Also, the left carb slide freed itself and moving the slide up and down with a finger I get the proper whooshing sound and resistance that makes me believe that vacuum diaphragm survived. This thing is acting like it really wants to be back on the road and not stripped for spares.
|
|
|
|
Post by farmrjohn on Oct 10, 2015 14:09:04 GMT -5
Nice progress! From what I've gathered on the XS-650 forums going with the pods and no airbox could disrupt the airflow into the BS38s causing some running/jetting issues. That Triumph mod for the airfilter seems to work well and keeps the box. Oh, to answer your question the main tractor is green with yellow wheels, the little one is yellow, with white wheels.
|
|
|
|
Post by don73tx750 on Oct 11, 2015 20:25:51 GMT -5
Hey FJohn, just curious about your tractors because making gears for the green ones supports my vintage bike addiction .
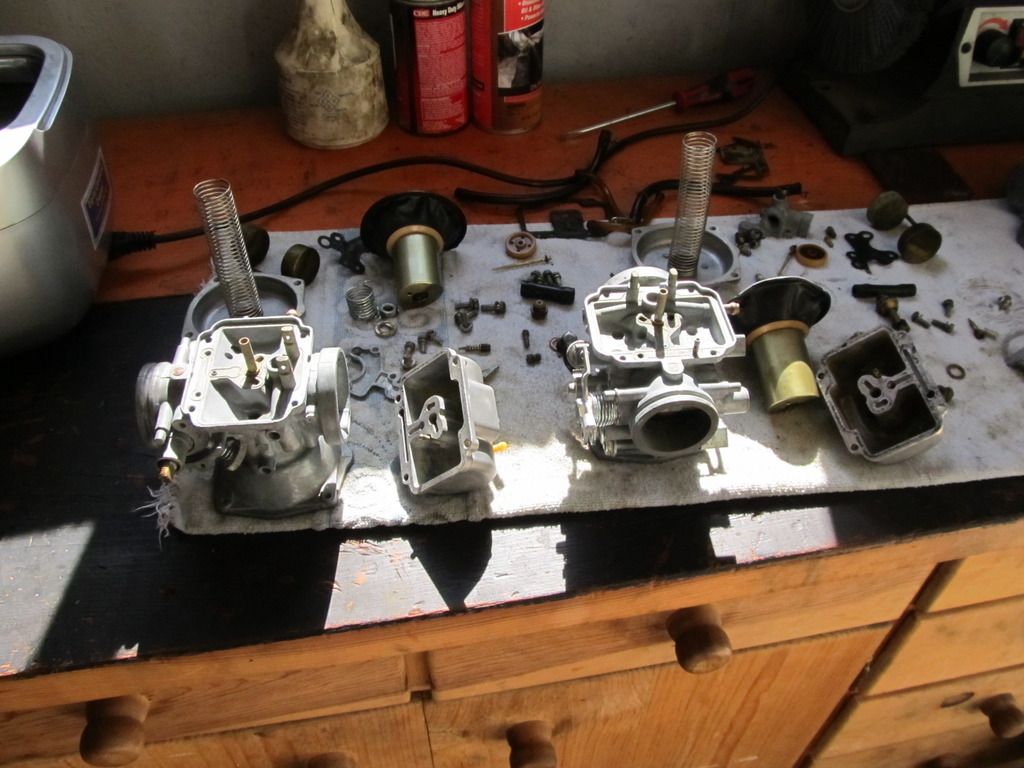
More progress today. Yesterday I pulled the carbs off. This is what the right one with the stuck slide looked like.
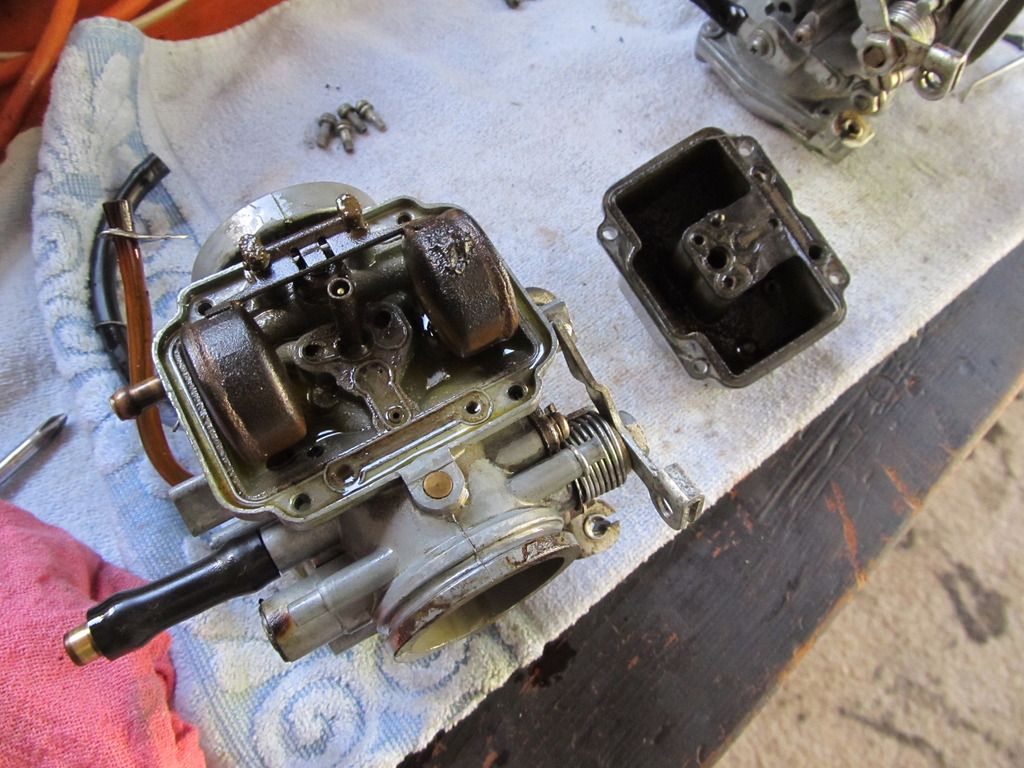
This was so nasty the float was glued to the pivot pin. The left carb looked the same. Here you need patience so I hosed them down with WD40. The second pic shows the varnish that had the slide glued into the carb body. Also notice whoever was in these carbs before pinched the diaphragms. I usually rebuild 2strokes with Mikuni VM round slides and when they have stuck slides putting them in boiling water will free them off. These being CV's with a vacuum diaphragm I didn't want to try that so hit it with a heat gun an got it loosened up that way. This morning the floats would move on the pins, so I grabbed my spring loaded center punch and persuaded the float pins out without wasting a pin tower. Been there and it sucks having to find another carb body. So into the ultrasonic cleaner they go. I have the big HF unit and fill it to the min. line with Simple Green, and then to the max. line with water. That cleaned everything up nice but a little varnish in the float bowls. Have a pail of water to rinse off as the SG is fairly caustic.
While the carbs were cooking I dumped out the gas tank and disassembled the petcocks. I ran them thru the cleaner and they're not going to make it. Both the "ON" long brass tubes are cracked almost to the base. Clicking on all these pics will make them bigger and you can see the crack on the right one.
So while the rest of that bench work was going I put on the new master cylinder. Got that bled and it took a couple good squeezes to blow out a blockage in the hose, probably at the cast junction where the brake switch screws in. Got clean fluid flowing out the bottom, put the line in the caliper pumped the pistons out far enough to grab some 1/8' plywood. Split the caliper, seated the pistons, cleaned the pads on the abrasive wheel in the bench grinder, and put it all back together. Front brakes sorted.

The muffler should be here tomorrow. I need to order carb kits and petcocks. While waiting for those I'm going to look at the points and check the timing. I'm still waiting for the FSM to get here so if anyone can tell me where the oil filter is and how to tell if it has had the balancer chain upgrade, or where to look for that I'd appreciate it. I'm guessing I will need one of those BMW filter adaptors if anyone has a spare to sell
Later, Don |
|
|
|
Post by farmrjohn on Oct 12, 2015 14:57:34 GMT -5
The oil filter is located on the left side, at the rear of the transmission case, behind the cover by the foot peg, where the front sprocket is. Looking at page 143 of the 4th edition shop manual, it looks like the end of balancer shaft 2 has a washer assembly bolted ever the end of the mounting nut (#10-12), which if removed, allows access to a slot on the end of the shaft to adjust it. The original as shown on page 50 just has a closed head nut. That would require removal of the left side crankcase covers to see. CCI12102015.pdf (570.28 KB) |
|
|
|
Post by retromech on Oct 13, 2015 8:35:47 GMT -5
you can see if non-adjustable or adjustable balancer shaft is fitted without having to remove any side covers, just need to get your eye level with shaft, as farmrjohn says the two types are visibly different.
|
|
|
|
Post by don73tx750 on Oct 18, 2015 19:15:16 GMT -5
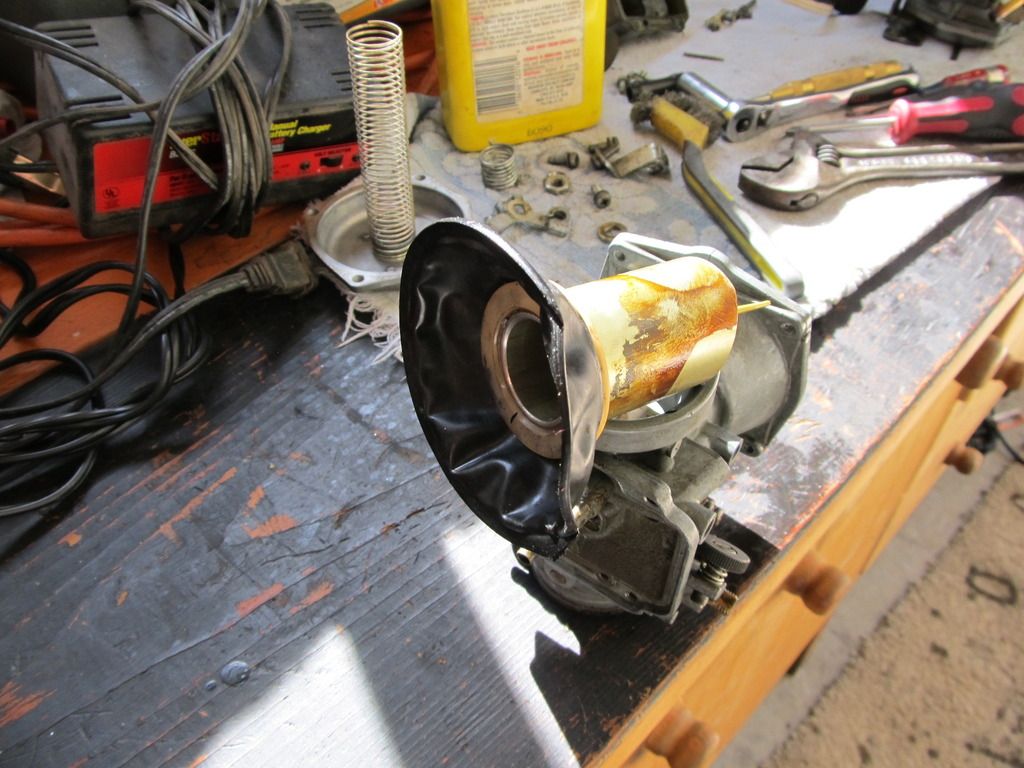
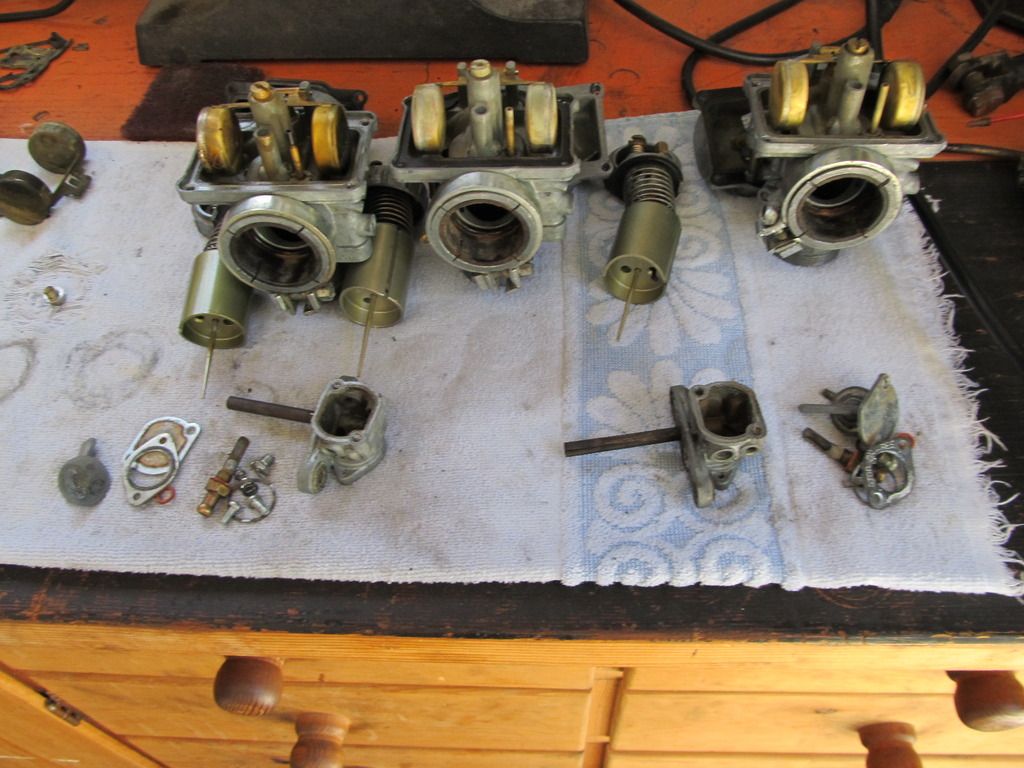
More progress. The carb kits, floats, and petcocks got here yesterday. Got the carbs together. The muffler showed up a few days earlier and I started with that first today. It won the first round but was no match for a big hammer lol! Took a punt on a fleabay unit and it looks great! Now I made more work getting the left one looking like this. 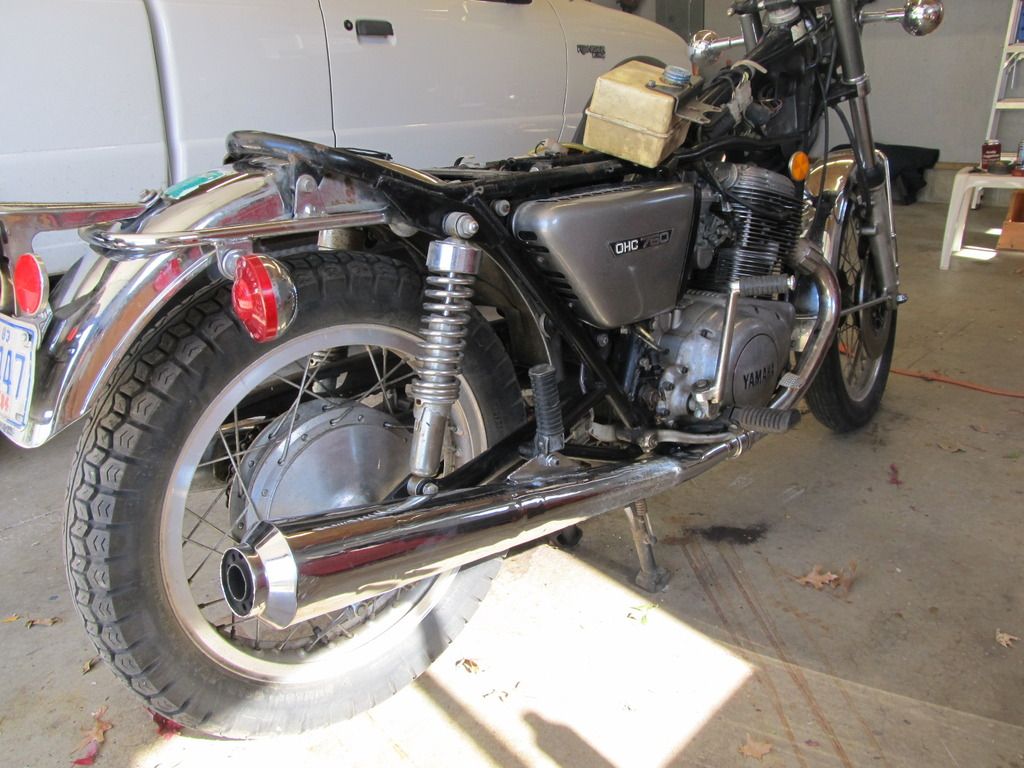 Then on to the electrics. The Pos. cable and fuse feed to the Ign. switch were scrap, A quick trip to the spares shelf nets a usable cable and fuse holder. Get that all hooked up to new battery Full voltage was all the right turn signal wanted. Now I don't have the fiddly job of pulling the flasher apart. Then the tail light was off. Good thing Yamaha is standard in using blue wire for the lights. Pulling apart the bullet on top of the rear fender, cleaned and plugged back in, sorted. Spark was scant on the left side again so it's time to pull the cover and clean the points. Hosed the whole neighborhood down with brake kleen and then checked the gaps. Both good but still had high resistance on the left, even after swiping with a business card soaked in juice. A chunk of 400 grit wet/dry pulled out the rest of the green crap and the left plug showed happy blue spark. OK, got spark and compression, after adjusting the too tight valves on the left cyl. The .002 spec just scares me, so I set them to the .004 the right side has. I'd rather hear the rockers than burn exh. valves. So now I need fuel and toss the carbs on. Hook up the test tank and leave it set while I put 2 1/2 qts. of 15/40 in the oil tank. Here's the reason I spend my free time in the shed playing with old bikes. Hit the starter button and...  it fires up. Idles a little ragged, of course, but it's running without any throttle help. The engine has some interior chain noise, but never hearing one of these run I decide it's time to do the happy dance and grab another beer! I get back and it's warmed up and cooking the WD40 loosened sludge off the motor, 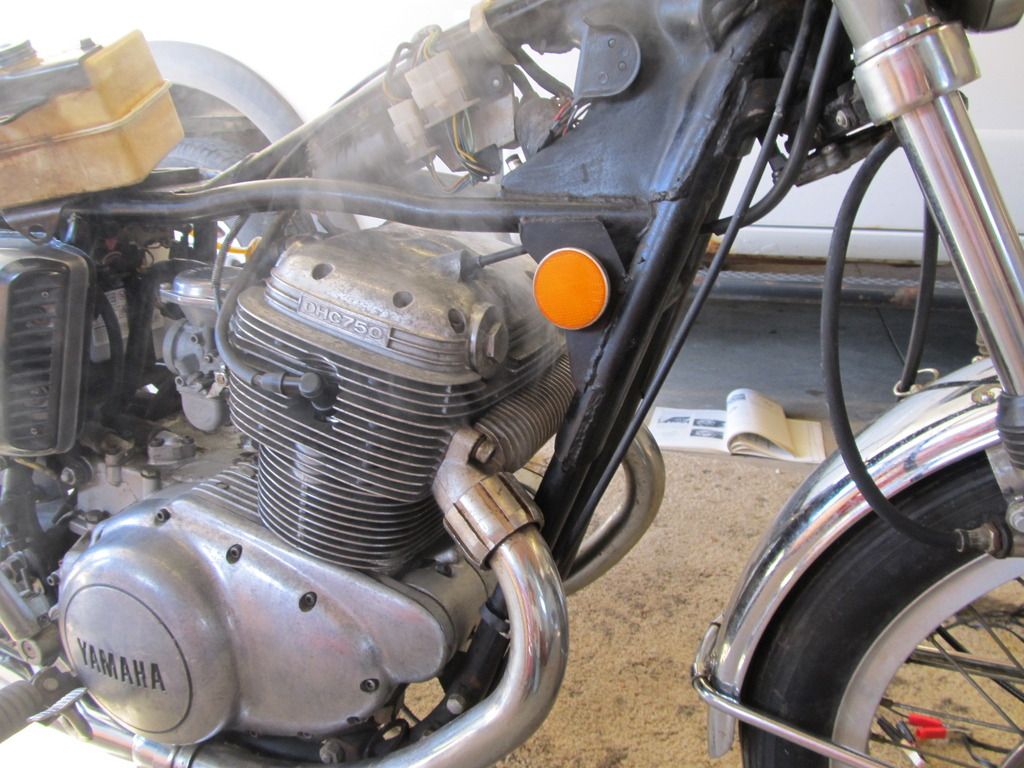 While it's cooking off I check the charging and get 14v. Score. Idle it down and see the left timing 9° and the right is 7°. Close enough for test and tune. So it runs and sounds good enough to thro a few more bucks at to get on the road. The drive chain has 1 spot it's tighten than a banjo string, but the rest I can almost pull totally off the rear sprocket. I have to change the wheels to get some safe tires on it anyway so will sort it when gets here. That leaves the gas tank. It's been soaking in a chelating bath for the last 4 days. Like Evapo-Rust but much cheaper to buy the concentrate from www.rustdepot.com . I noticed a difference in the mufflers when that new right one was running hotter than the old left one. The ring around the main discharge hole is drilled where the stock one isn't. Did that change between 73-74? 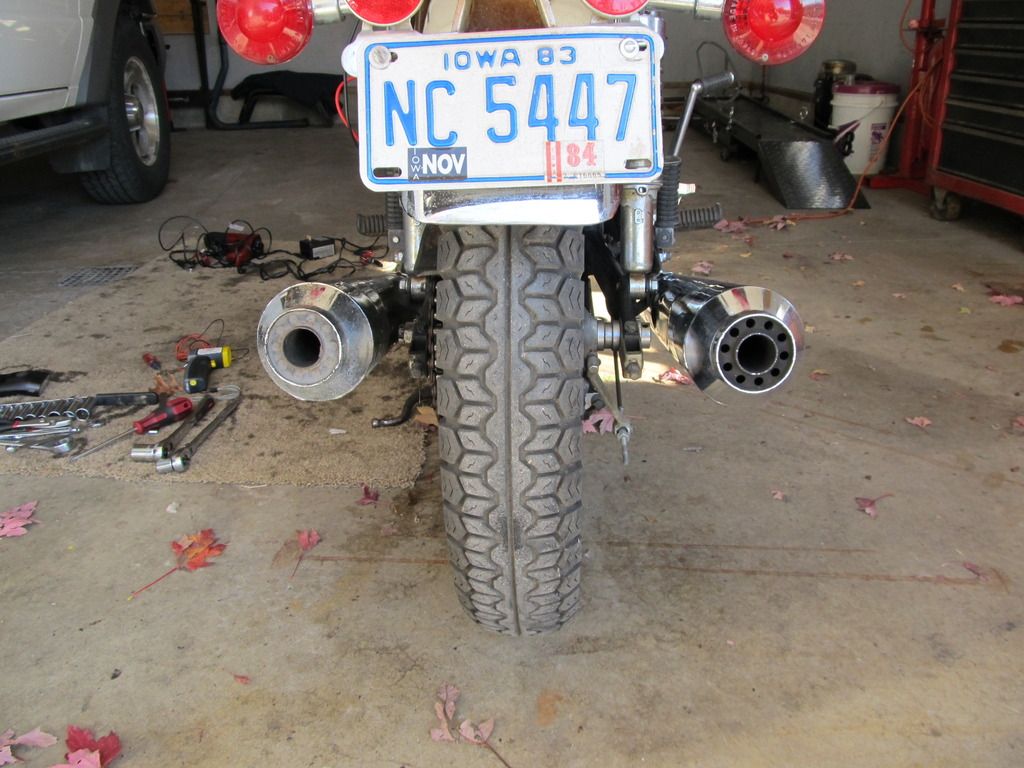 So getting the gas tank sorted, changing the chain and wheels, leaves the seat. This is going to be a total bodge but I'm cheap and use what I have on hand LOL! I'm going to stuff as many plastic shopping bags as it takes up the hole in the seat pan to firm up the front where the mice chewed out the foam. I'll be back after taking this pig for a ride. |
|
|
|
Post by retromech on Oct 19, 2015 4:18:15 GMT -5
Don,
Belated welcome to the world of the TX from here the U.K., hoping your enthusiasm fires us all up, pleased to see you progressing with your bike so well, well done !!!!, as you are a busy man I will leave it at that for now.
Regards Paul
|
|
|
|
Post by don73tx750 on Oct 24, 2015 22:12:57 GMT -5
More progress yesterday. The chain and foam pods got here, so all the parts are on-hand. 3 days ago I emptied the gas tank of the chelating rust remover and filled it with a gallon of concrete etch, "phosphoric acid", and hot water to kill the rest of the rust. Leaves a grey coating on the steel. Removed that, dried it out and threw the petcocks on. While the tank was soaking, I stuffed the seat. Vastly underestimated the # of plastic bags needed and finished it off with some packing paper . So last night I threw the seat and tank on, with some new fuel lines and filters. Like XS650's, the lines route better going to the off side carb, left petcock to right carb ect. Then I fired it up and rode down the alley and back. I got into 2nd gear so I know at least 2 gears work lol! 
Then I had a little more time and dug the XS650 wheels out of the rack. The front had the later brake disc on and when I pulled it off a couple of the lock tabs broke. Miracle Whip spares jar to the rescue lol! 
I didn't have the ambition to change the wheels and drive chain tonight, but fired it up to try to track down where the rattling chain noise was coming from. Sounds loudest up front by the starter sprag clutch. I'm going to pull the cover and have a look. Anything in particular I should be looking for?
|
|
|
|
Post by retromech on Oct 25, 2015 2:41:41 GMT -5
Starter clutch is one of the problem areas on a TX as I am sure you are aware, my experience of mine shows you do not have to look hard to see problems in this area, ranging from broken housings, worn or early level components, a quick read through the service notes provides lots of clues ,I guess the ultimate cure is Argo's better engineered sprag is the answer, luckily for me a friend of mine had a complete new genuine starter clutch of the latest level available, and I bought a new gear off ebay, both huge amounts of luck.
|
|
|
|
Post by don73tx750 on Oct 25, 2015 9:21:32 GMT -5
Thanks for the tips Paul. Looks like it's off to fleabay to find some gaskets. I'll have an update later today after I get home from work and get the wheels/drive chain on.
|
|
|
|
Post by don73tx750 on Oct 25, 2015 18:10:31 GMT -5
After work today I went straight to the shed and got stuck in. With the bike on the center stand and a floor jack under the front of the motor the front wheel rolled right out and in with the XS unit. Then on to the back wheel and notice the mufflers have to come off. Stupid design there, but I wanted to see if the mice built a nest in the left one anyway. No blockage was found so the right muffler running hotter is probably due to it flowing better with that rear plate being drilled out. Got the wheel off then took the master link out of the chain and used the old chain to pull the new one around the front sprocket. Had to loosen the adjusters and move the axle as far forward as it would go to get the master link in the new chain. Then I put it together and ran it around the block. Got into 3rd gear and the tranny shifts fine. So it's on the road in 19 days after being parked up 30 years. I still hope to get it out on the highway but riding season is all but over here. So here's what it looks like with the XS wheels with a minty fresh set of Bridgestone Spitfires on.

Anybody hazard a guess what this things worth? I don't think there's a big market for these. Thanks again for the help. I really appreciate it.
Regards, Don |
|
|
|
Post by oledirtydoc on Oct 28, 2015 21:30:24 GMT -5
Damn looking good
|
|


 .
. 

 !
!


